前言
在游戏世界中有贴花有许多应用场景。 最近特效遇到个BUG: 释放的技能在非平地时,会遇到显示不全的问题。 在查看目前手游的相关解决方案时查看, 一般手游中,会尽量使用平的地面来避免, 另一种既是使用_贴花_。
贴花有不同的实现方式: 计算网格、projector投影。 下面就分别介绍相关的知识及应用。
Projector 基础知识
参考网址Opengl在u3d中实现Projector , Projector中包含有相应的材质,通过使用另加的一个pass,对所有位于Projector范围内的物体作出反应。
以下为通常用到的Projector Shader : 将影响到的物体转移到Projector 矩阵当中,然后将material中图片与framebuffer中的颜色进行混合:
Shader "Cg projector shader for adding light" {
   Properties {
      _ShadowTex ("Projected Image", 2D) = "white" {}
   }
   SubShader {
      Pass {
         Blend One One
            // add color of _ShadowTex to the color in the framebuffer
         ZWrite Off // don't change depths
         Offset -1, -1 // avoid depth fighting

         CGPROGRAM

         #pragma vertex vert
         #pragma fragment frag

         // User-specified properties
         uniform sampler2D _ShadowTex;

         // Projector-specific uniforms
         uniform float4x4 _Projector; // transformation matrix
            // from object space to projector space

          struct vertexInput {
            float4 vertex : POSITION;
            float3 normal : NORMAL;
         };
         struct vertexOutput {
            float4 pos : SV_POSITION;
            float4 posProj : TEXCOORD0;
               // position in projector space
         };

         vertexOutput vert(vertexInput input)
         {
            vertexOutput output;

            output.posProj = mul(_Projector, input.vertex);
            output.pos = mul(UNITY_MATRIX_MVP, input.vertex);
            return output;
         }


         float4 frag(vertexOutput input) : COLOR
         {
            if (input.posProj.w > 0.0) // in front of projector?
            {
               return tex2D(_ShadowTex ,
                  input.posProj.xy / input.posProj.w);
               // alternatively: return tex2Dproj(
               //    _ShadowTex, input.posProj);
            }
            else // behind projector
            {
               return float4(0.0, 0.0, 0.0, 0.0);
            }
         }

         ENDCG
      }
   }
   Fallback "Projector/Light"
}
关于Unity中Projector的设置与注意事项, 可以参考这篇文章的步骤 。
通过计算网格实现贴花
贴花的一种实现方式是,通过与所用碰撞体接触的场景,计算出新的网格,从而实现贴花效果。
目前插件Simple Decal System(免费) 既是使用此种方案。
如下图所示为Simple Decal System的截屏:
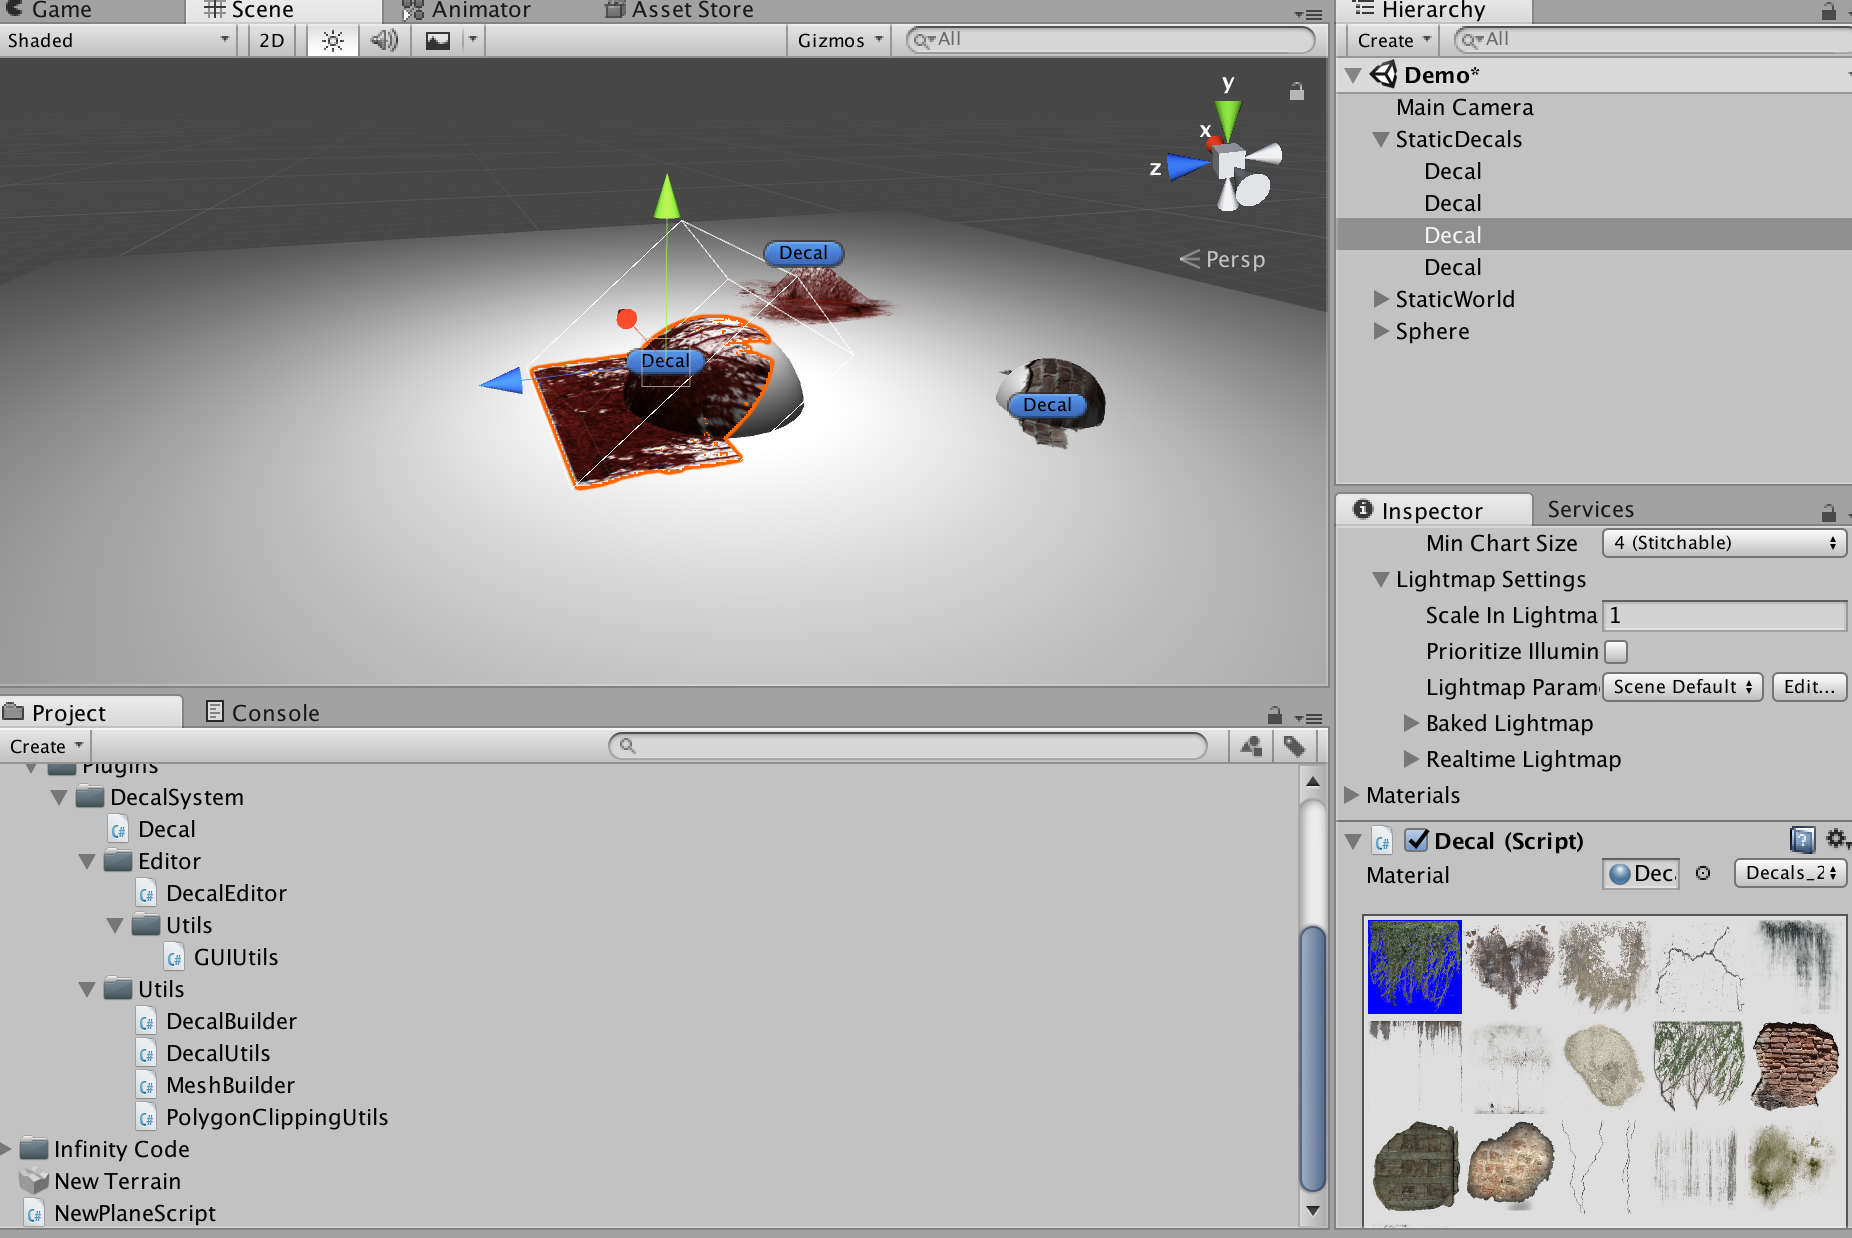
主要步骤思路如下:
-
确定受影响的物体:
DecalUtils.GetAffectedObjects( decal );将所有MeshRenderer与Decal进行碰撞比较 - 将被影响物体转移到decal坐标系中,重新构建mesh
- 根据重新构建的material信息,完成贴花
延迟贴花系统
这个是根据官网的一篇介绍Command Buffer中提到的方式,_CommandBuffer_通过将渲染指令在特定渲染流水线时间点执行,以此来扩展unity的渲染管线。

上图为Command Buffer指令可以扩展渲染流水线的位置。
上图为deferred decals。
下载其源码可以看到,在_DeferredDecalSystem_脚本中,维护m_DecalsDiffuse等HashSet,然后在CameraEvent.BeforeLighting,在计算光照之前渲染队列中所有mesh。
      buf = new CommandBuffer();
      buf.name = "Deferred decals";
      m_Cameras[cam] = buf;

         // set this command buffer to be executed just before deferred lighting pass
         // in the camera
         cam.AddCommandBuffer (CameraEvent.BeforeLighting, buf);
      }

      //@TODO: in a real system should cull decals, and possibly only
      // recreate the command buffer when something has changed.

      var system = DeferredDecalSystem.instance;

      // copy g-buffer normals into a temporary RT
      var normalsID = Shader.PropertyToID("_NormalsCopy");
      buf.GetTemporaryRT (normalsID, -1, -1);
      buf.Blit (BuiltinRenderTextureType.GBuffer2, normalsID);
      // render diffuse-only decals into diffuse channel
      buf.SetRenderTarget (BuiltinRenderTextureType.GBuffer0, BuiltinRenderTextureType.CameraTarget);
      foreach (var decal in system.m_DecalsDiffuse)
      {
         buf.DrawMesh (m_CubeMesh, decal.transform.localToWorldMatrix, decal.m_Material);
      }
      // render normals-only decals into normals channel
      buf.SetRenderTarget (BuiltinRenderTextureType.GBuffer2, BuiltinRenderTextureType.CameraTarget);
      foreach (var decal in system.m_DecalsNormals)
      {
         buf.DrawMesh (m_CubeMesh, decal.transform.localToWorldMatrix, decal.m_Material);
      }
      // render diffuse+normals decals into two MRTs
      RenderTargetIdentifier[] mrt = {BuiltinRenderTextureType.GBuffer0, BuiltinRenderTextureType.GBuffer2};
      buf.SetRenderTarget (mrt, BuiltinRenderTextureType.CameraTarget);
      foreach (var decal in system.m_DecalsBoth)
      {
         buf.DrawMesh (m_CubeMesh, decal.transform.localToWorldMatrix, decal.m_Material);
      }
      // release temporary normals RT
      buf.ReleaseTemporaryRT (normalsID);
注意: 必须使用Deferred Renderring Path才能够使用此种方法。
Particle Decal
粒子Particle也会产生贴花,例如水枪能在地板/墙上随意涂鸦,留下的痕迹便是Decal。同理,粒子特效爆炸等同样可以留在痕迹。
参考自官网例程 : 例子教学地址及下载地址
原理为Particle碰撞,找出碰撞位置,particle画上。其中也有pool优化等,可参考源码。
    void OnParticleCollision(GameObject other)
    {
        int numCollisionEvents = ParticlePhysicsExtensions.GetCollisionEvents (particleLauncher, other, collisionEvents);

        int i = 0;
        while (i < numCollisionEvents)
        {
            dropletDecalPool.ParticleHit(collisionEvents[i], particleColorGradient);
            i++;
        }

    }
小结
介绍了几种Decal System实现贴花方式。在Asset Store中的 Dynamic Decals, 测试之后发现,由于使用__Replace Shader__ 等,效率没达到要求。 所以最后还是使用 Easy Decal 只不过由于封装为DLL, 还是需要使用.Net Reflector等工具来修改。